
SKUtrak's Exports section makes it easy to download harmonised retailer data in one place. It gives you complete control over the retailers, products, time period and metrics to include in your data download.
How to Export Data
Follow these steps to create and download a custom export.
- Navigate to Exports > Manage Exports screen.
- Click + Create Export (top right), and then select Start from Scratch.
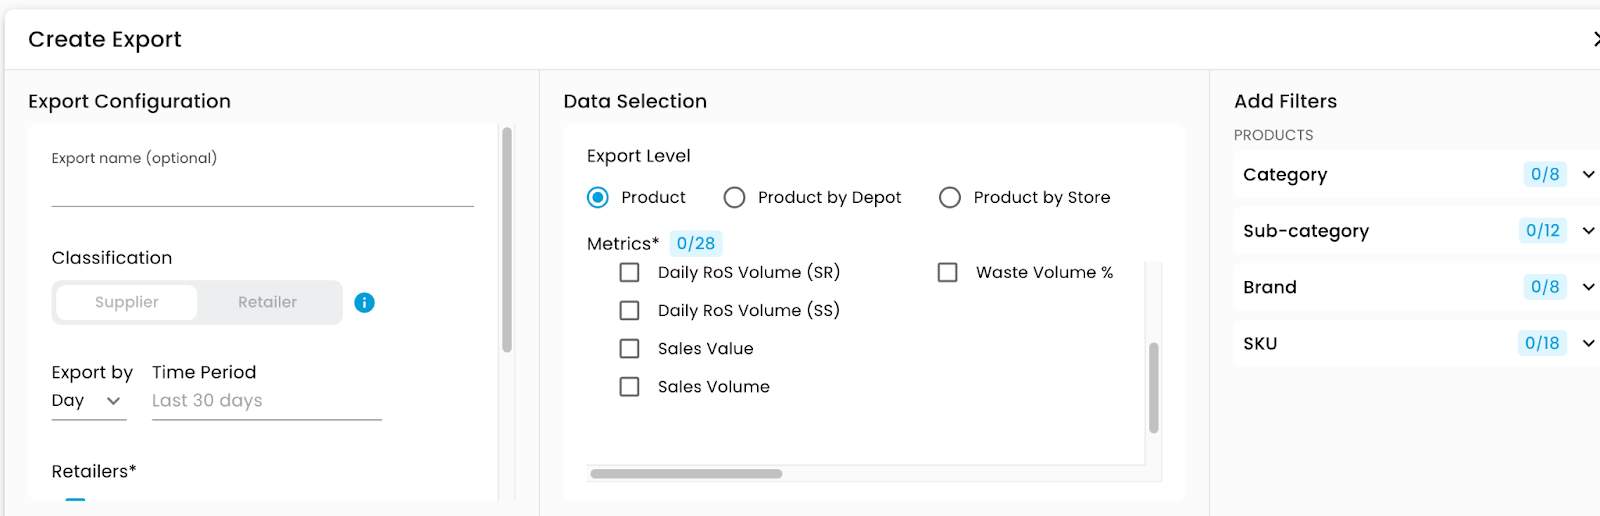
- In the Export Configuration tab, optionally add a name for your export.
- In the Export Classification section, choose whether to use your product classification (supplier) or the retailer's (retailer) .
- Note: When using the Retailer classification, you can only select one retailer at a time.
- Select the retailers to include using the filters on the left. All connected retailers are selected by default.
- Choose your date grain, which determines how data will be grouped in your export. The options are:
-
Day
-
Calendar Week
-
Retailer Week (defined by each retailer)
-
Month
-
If you have used a dynamic date range (e.g. Calendar Week / Retailer Week / Month), this will automatically update to reflect the last complete period based on your selected date grain.

You can still include the current, incomplete week if you want the most up-to-date data - just toggle on the ‘Include partial weeks/months’ option to include partial periods.

7. Select your time period; you can choose from pre-set relative date ranges or set custom dates.
8. Choose your Export Level. The options are:
-
-
Product (Export is Estate level)
-
Product by Depot (Export contains Depot-specific metrics)
-
Product by Store (Export contains Store-level breakdown metrics)
-
Product by Customer & Order (Export contains Customer and Order breakdown metrics)
-
Product by Customer, Order & Store (Export contains Customer and Order and Store-level breakdown metrics)
*Please note these are subject to plan and retailer access
-
9. When ready, click Export to generate your file.
10. You’ll be redirected to the Exports landing page, where the file will be available once it’s ready.
-
-
Large exports may take a few minutes to process.
-
The status will be shown next to each export in the list.
-
How to Duplicate a Previous Export
Duplicating an export is a quick way to reuse an existing configuration and pull the latest data.
Steps
-
Find the export you want to duplicate on the Exports page.
-
On the right-hand side, click the copy icon (next to the Download button).
-
Select Duplicate export.
-
A new export will appear with the same configuration as the original.
-
-
Review and update the Export Settings as needed:
-
If the original used a dynamic date range , this will automatically update to reflect the last complete period.
-
If the export used custom or fixed dates, you may need to update them manually.
-
-
Click Run to generate the updated export.

Your duplicated export will now appear in the export list and can be downloaded once it's ready.
Save time with Export Templates
Discover more in our product guide available here.
This includes details on how to run Export Schedules, where you can assign a schedule to any Export Template, set to run daily, weekly, or monthly, direct to your email.